 |
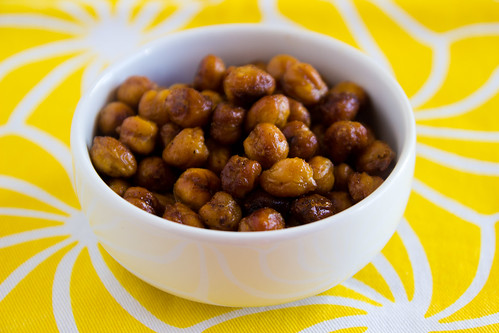
| Roasted Chickpeas |

Showing posts with label recipes - snacks. Show all posts
Showing posts with label recipes - snacks. Show all posts
Saturday, March 17, 2012
Roasted Chickpeas
I bought some dried chickpeas last weekend and decided to roast them. First the dried chickpeas had to be soaked for 12 hours (after which they expanded about 2.5 times their original size) and then simmered in boiling water for about an hour. After they've been drained, cooled, and dried, I tossed them with olive oil, salt, garlic salt, ground cayenne pepper, and lots of smoked paprika. Then I placed the chickpeas in a jelly roll pan and roasted them at 400°F. I started checking on them after about 30 minutes. For some reason, the chickpeas didn't roast evenly, so I had to start removing the ones that were done, stir the rest and continue roasting until they were done, checking occasionally, of course. Great snack!
Friday, March 2, 2012
Toasted Ciabatta with Fontinella Cheese and Black Bean Dip from Cinco de Mayo Salsas
I'm not really into black beans per se, so of the many varieties of Cinco de Mayo Salsas, the Black Bean Dip was I had never really considered getting. R., on the other hand, loves beans of all kinds (to my dismay...), and as he was getting a taste of the black bean dip, owner Arturo suggested a great snack option: Ciabatta bread topped with some black bean dip and fontinella cheese, then toasted. R. also happens to be a bread fiend, so this was pretty much the ideal snack for him! Arturo had suggested ciabatta from Breadworks, but we couldn't get it in the Strip District so instead bought ours from Ryan outside the Jimmy & Nino Sunseri store. We decided to skip the cheese line at Penn Mac and got our fontinella next door at Stamboolis Brothers.
Even though I'm not big into black beans, I really liked this snack!
P.S. This doesn't look like ciabatta because I had to slice the loaf vertically rather than horizontally, as by the time I got around to snapping photos of this, R. had already finished most of the bread!
Click here for more recipes using Cinco de Mayo Salsas, available at the Pittsburgh Public Market during the winter and all around town during the farmers market season.
Even though I'm not big into black beans, I really liked this snack!
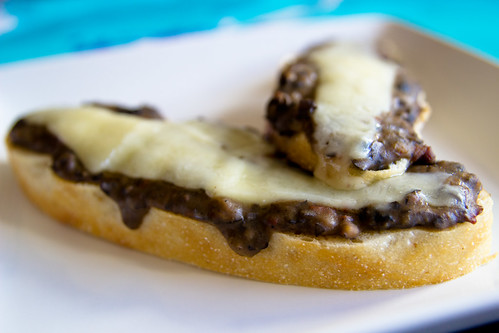 |
| Toasted Ciabatta with Fontinella Cheese and Black Bean Dip |
P.S. This doesn't look like ciabatta because I had to slice the loaf vertically rather than horizontally, as by the time I got around to snapping photos of this, R. had already finished most of the bread!
Click here for more recipes using Cinco de Mayo Salsas, available at the Pittsburgh Public Market during the winter and all around town during the farmers market season.
Sunday, December 4, 2011
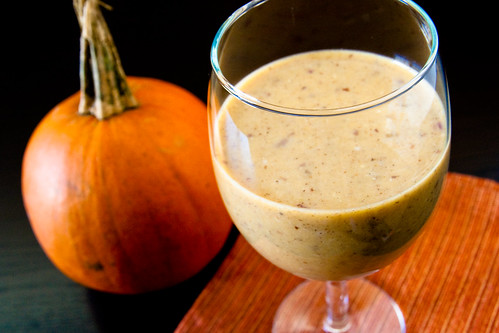
Pumpkin Spice Soy Smoothie
Last weekend I posted a recipe for my Strawberry Soy Smoothie, which took many weeks of experimentation to finally get right. Sadly, strawberries are no longer in season, so I wanted to make a version of my breakfast smoothie that would incorporate more fresh fall flavors. So, I learned to puree pumpkins and started experimenting again! Luckily, it turns out that once you have the smoothie base down, it's easy to switch up the ingredients.
In fact, I think the Pumpkin Spice Soy Smoothie really rocks, if I may say so myself! And low calorie, too!
Ingredients
Pumpkin puree, 1.5 cups (see below for directions)
Pumpkin pie spice, 1 tsp
Cinnamon, 1 tsp
Nutmeg, 1 tsp
Bananas, frozen, 2 medium (7" to 7-7/8" long)
Grapes, red seedless, frozen, 2 cups
Tofu, soft, 320 grams
Milk, skim, 1.5 cups (or 3 cups if making a non-caffeinated version)
Tea, brewed, 12 fl oz (or skip or making a non-caffeinated version)
Flax seed, ground, 4 tbsp (or ground nuts)
Stevia, to taste (I use about 1.5 tsp)
Directions
For pumpkin puree:
N.B.: If you have a standard size blender or food processor, it may be necessary to split the ingredients in half and complete the procedure twice.
Other Notes:
I prefer to freeze fresh fruits when they are sufficiently ripe and then use them later when I need them to make smoothies, and this eliminates the need for added ice that might dilute the flavor. However, it is certainly feasible to use the unfrozen version of the fruits and just add a bit of ice to make it cold.
Number of Servings: 4 (16 oz) servings
Printable versions of the recipe: Caffeinated and non-caffeinated.
In fact, I think the Pumpkin Spice Soy Smoothie really rocks, if I may say so myself! And low calorie, too!
 |
| Pumpkin Spice Soy Smoothie |
Ingredients
Pumpkin puree, 1.5 cups (see below for directions)
Pumpkin pie spice, 1 tsp
Cinnamon, 1 tsp
Nutmeg, 1 tsp
Bananas, frozen, 2 medium (7" to 7-7/8" long)
Grapes, red seedless, frozen, 2 cups
Tofu, soft, 320 grams
Milk, skim, 1.5 cups (or 3 cups if making a non-caffeinated version)
Tea, brewed, 12 fl oz (or skip or making a non-caffeinated version)
Flax seed, ground, 4 tbsp (or ground nuts)
Stevia, to taste (I use about 1.5 tsp)
Directions
For pumpkin puree:
- Preheat oven to 400 F. Place the whole pie pumpkin in the oven and roast for 10 minutes. Remove from oven and let cool.
- Once cool, remove the stem and cut pumpkin in half, vertically. (The pre-roasting should make this step a lot easier than cutting a raw pumpkin.)
- Remove seeds and save for another use (such as roasting them). Remove the fibers using kitchen scissors.
- Place the halved pumpkins, flesh side down, on a baking pan lined with parchment paper. Bake for 25 minutes or until soft. Let cool completely.
- Scoop up the roasted flesh and place in food processor. Process until smooth.
N.B.: If you have a standard size blender or food processor, it may be necessary to split the ingredients in half and complete the procedure twice.
- Blend ingredients together in a blender or food processor. Enjoy!
Other Notes:
I prefer to freeze fresh fruits when they are sufficiently ripe and then use them later when I need them to make smoothies, and this eliminates the need for added ice that might dilute the flavor. However, it is certainly feasible to use the unfrozen version of the fruits and just add a bit of ice to make it cold.
Number of Servings: 4 (16 oz) servings
Printable versions of the recipe: Caffeinated and non-caffeinated.
Tuesday, November 29, 2011
Strawberry Soy Smoothie
I'm a busy gal, particularly on weekday mornings. I usually start my day with an early workout at the gym, then I dive head first into rush hour traffic which seems to just get busier and busier by the day (thanks, PA construction!), so I don't really have time to enjoy a leisurely sit-down breakfast before work. For the past few months, I have been experimenting with a breakfast smoothie I could sip in my car during my morning commute. My goal: A smoothie that's tasty, healthy, filling, and gives me just the boost I need in the morning. Simple enough, eh?
Well, I did a lot of recipe tweaking. In the process, I made smoothies that were too thick, not thick enough, too bland, too filling, not filling enough...you get the idea. I started out with strawberries, bananas, milk, and tofu, played around with the relative proportions of each ingredient, and eventually added grapes for its tart sweetness, flax seed meal for its fullness factor, tea for the caffeine boost, and stevia to sweeten the tea-infused drink without adding any calories or causing my blood sugar to go out of whack.
But after much hard work, I think I've finally got it. Introducing...the Strawberry Soy Smoothie:
The best part: A 16-ounce serving (that's 2 cups!) has only 213 calories but it is pretty filling - the 9.6 grams of protein helps a lot - and contains all the Vitamin C you need for the day. Of course, now that I've got this thing down to a science, strawberries are no longer in season! Now that fall is in full swing, I have been experimenting with a pumpkin smoothie, and I'm sure there will be post on that soon. But in the meantime, here's the recipe for the Strawberry Soy Smoothie:
Ingredients
Strawberries, frozen, 2 cups
Bananas, frozen, 2 medium (7" to 7-7/8" long)
Grapes, red seedless, frozen, 2 cups
Tofu, soft, 320 grams
Milk, skim, 1.5 cup
Tea, brewed, 12 fl oz
Flax seed, ground, 4 tbsp
Stevia, to taste (I use about 1 tsp of liquid stevia, but I don't like it too sweet personally)
Directions
Note: If you have a standard size blender or food processor, it may be necessary to split the ingredients in half and complete the procedure twice.
Other Notes:
I prefer to freeze fresh fruits when they are sufficiently ripe and then use them later when I need them to make smoothies, and this eliminates the need for added ice that might dilute the flavor. However, it is certainly feasible to use the unfrozen version of the fruits and just add a bit of ice to make it cold.
Variations:
For a printable version of the recipe, click here.
And the full list of nutritional facts can be found here.
Well, I did a lot of recipe tweaking. In the process, I made smoothies that were too thick, not thick enough, too bland, too filling, not filling enough...you get the idea. I started out with strawberries, bananas, milk, and tofu, played around with the relative proportions of each ingredient, and eventually added grapes for its tart sweetness, flax seed meal for its fullness factor, tea for the caffeine boost, and stevia to sweeten the tea-infused drink without adding any calories or causing my blood sugar to go out of whack.
But after much hard work, I think I've finally got it. Introducing...the Strawberry Soy Smoothie:
 |
| Strawberry Soy Smoothie |
The best part: A 16-ounce serving (that's 2 cups!) has only 213 calories but it is pretty filling - the 9.6 grams of protein helps a lot - and contains all the Vitamin C you need for the day. Of course, now that I've got this thing down to a science, strawberries are no longer in season! Now that fall is in full swing, I have been experimenting with a pumpkin smoothie, and I'm sure there will be post on that soon. But in the meantime, here's the recipe for the Strawberry Soy Smoothie:
Ingredients
Strawberries, frozen, 2 cups
Bananas, frozen, 2 medium (7" to 7-7/8" long)
Grapes, red seedless, frozen, 2 cups
Tofu, soft, 320 grams
Milk, skim, 1.5 cup
Tea, brewed, 12 fl oz
Flax seed, ground, 4 tbsp
Stevia, to taste (I use about 1 tsp of liquid stevia, but I don't like it too sweet personally)
Directions
Note: If you have a standard size blender or food processor, it may be necessary to split the ingredients in half and complete the procedure twice.
- Blend ingredients together in a blender or food processor. Enjoy!
Other Notes:
I prefer to freeze fresh fruits when they are sufficiently ripe and then use them later when I need them to make smoothies, and this eliminates the need for added ice that might dilute the flavor. However, it is certainly feasible to use the unfrozen version of the fruits and just add a bit of ice to make it cold.
Variations:
- In the fall I sometimes substitute 1 cup of apple cider for the grapes.
- I have also occasionally substituted ground nut for the flax seed meal with great results.
- I also make a version of this for lunch or as an afternoon snack that uses twice the amount of milk, which adds 30 calories and 3 grams of protein per serving, and omitting the tea as well as the stevia (without the tea, I find it unnecessary to add the sweetener). It actually tastes better than the breakfast version with tea, in my opinion!
For a printable version of the recipe, click here.
And the full list of nutritional facts can be found here.
Sunday, October 30, 2011
Roasted Pumpkin Seeds
A couple weekends ago when fall was still in full swing, R. and I went to Soergels Orchards with his dad and stepmom during its Fall Festival. (Sadly, there was no running into TomKat on this particular day!) The place was packed even though the Steelers game was about to start. We walked around the stores and the grounds a bit and tasted some wine from Arrowhead Wine Cellars, but one of the main goals of this visit was to get a pumpkin. I can't say that pumpkin carving is part of my own family's tradition, but R. really wanted to do it, so I obliged. After about 15 minutes of searching, we found the perfect pumpkin and brought it home.
R. cut out the top and I helped him remove the seeds and the goop. And then I had the honor of designing the face. Honestly, I can't remember the last time I carved a pumpkin. In fact, I can't remember if I've ever done it before. Crazy, I know. So given my limited experience, I decided to go with a simple and safe design:
It works, no? ;)
Now what to do with the seeds? R. called up his mom for help, who suggested paprika, garlic powder, salt, and olive oil. So we laid the pumpkin seeds out on a cookie sheet and sprinkled on the various ingredients until the seeds looked well-seasoned. We then baked the seeds at 250 degrees, checking and turning every 10 minutes, until the seeds were crunchy. In all, it took about 40 minutes of baking time.
The pumpkin seeds were glorious! How could I have missed the tradition of pumpkin carving/seed roasting all these years? I have to say, I was skeptical that I would enjoy carving a pumpkin, but it ended being quite a lot fun.
We'll have to do it again next year. :) I might even try a fancier design for our jack-o-lantern!
Happy Hallowe'en!
R. cut out the top and I helped him remove the seeds and the goop. And then I had the honor of designing the face. Honestly, I can't remember the last time I carved a pumpkin. In fact, I can't remember if I've ever done it before. Crazy, I know. So given my limited experience, I decided to go with a simple and safe design:
 |
| My first jack-o-lantern that I can remember! |
It works, no? ;)
Now what to do with the seeds? R. called up his mom for help, who suggested paprika, garlic powder, salt, and olive oil. So we laid the pumpkin seeds out on a cookie sheet and sprinkled on the various ingredients until the seeds looked well-seasoned. We then baked the seeds at 250 degrees, checking and turning every 10 minutes, until the seeds were crunchy. In all, it took about 40 minutes of baking time.
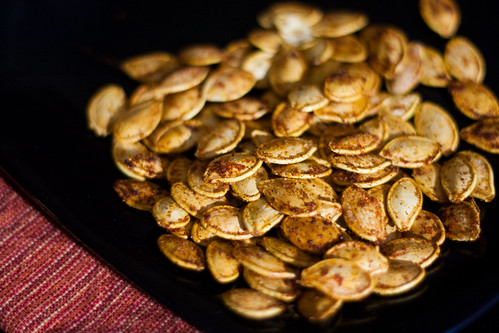 |
| Roasted Pumpkin Seeds |
The pumpkin seeds were glorious! How could I have missed the tradition of pumpkin carving/seed roasting all these years? I have to say, I was skeptical that I would enjoy carving a pumpkin, but it ended being quite a lot fun.
We'll have to do it again next year. :) I might even try a fancier design for our jack-o-lantern!
Happy Hallowe'en!
Subscribe to:
Posts (Atom)