Showing posts with label recipes - vegan. Show all posts

Friday, July 27, 2012

Ginger Pasta Salad

You know how they say your tastebuds change every seven years?  Well, I don't know about that, but I'm sure everyone has had the experience of liking certain foods they didn't used to before.  Ginger is one of those foods for me.  As a child, I hated ginger, though that's not saying much since I have yet to meet a child who likes it.  But now that I'm older (and wiser?), I have grown to love this Asian spice.  Lately, I've been particularly inspired to experiment with it in the kitchen, so here's the first of a series of ginger recipes I've been working with in recent weeks.

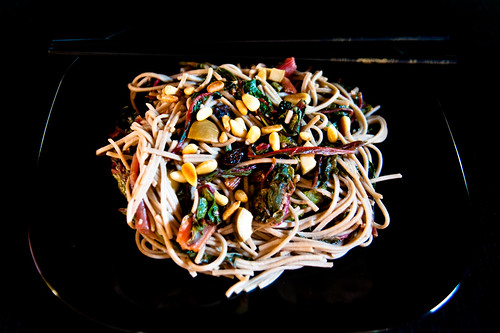
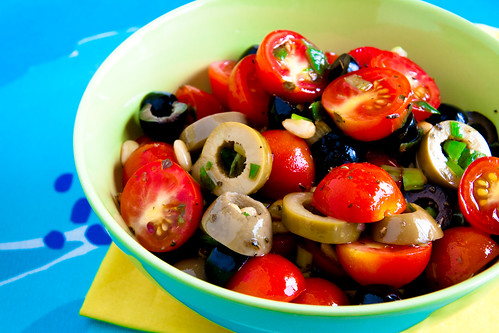
R. and I were visiting his mom for the fourth of July and we had some of her homemade ginger pasta salad - no exaggerations here, but it was the first pasta salad I've ever liked.  It was so good that after we got home, I wanted to try making it myself.  While I could have just asked mom-in-law for her recipe, I wanted to see if I could recreate her dish on my own, and this is what I came up with.
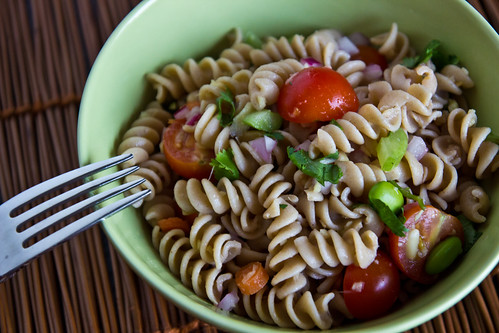
Ginger Pasta Salad
Ginger Pasta Salad

Ingredients:

Celery, 2 stalks, diced
Cherry tomatoes, about 24, halved
Edamame, 5 oz
Red onion, 1/2, small diced
Cilantro, 1 cup chopped
Baby carrots, 1/2 cup sliced
Red pepper, 1/2, diced
Red wine vinegar, 1/2 cup
Whole wheat rotini, 1 (1 lb) package
*Ginger, 3 tbsp freshly grated
Pine nuts, 1/3 cup, toasted

Directions:
  1. Cook rotini according to package directions.  Drain.
  2. In a large bowl, mix the first seven ingredients together (from celery to red pepper).
  3. In another large bowl, toss together the cooked rotini, grated ginger, and red wine vinegar.
  4. Pour the pasta into the mixed veggies.  Toss well.  Top with toasted pine nuts.
*Disclaimer:  I am a ginger fiend and like to be able to taste it in my dish, so I am rather generous when it comes to the amount of ginger to use.  It may or may not work for everybody.

Sunday, April 22, 2012

Avocado Salad with Corn, Black Bean, and Tomatillo from Cinco de Mayo Salsas

Avocado Salad with Corn, Black Bean, and Tomatillo from Cinco de Mayo Salsas
Avocado Salad with Corn, Black Bean, and Tomatillo 

Arturo of Cinco de Mayo Salsas taught my friend this simple snack by mixing his Corn and Black Bean Salad and Tomatillo sauce and adding an avocado.  She was raving about it afterwards, so I just had to try it myself!
Ingredients:
1 (16-oz) container of Corn and Black Bean salad from Cinco de Mayo Salsas
1 (16-oz) container of Tomatillo sauce from Cinco de Mayo Salsas
1 perfectly ripe avocado, diced 
Directions:
Mix the Corn and Black Bean salad and the Tomatillo sauce together.  Add the avocado.  Enjoy.
Since I liked all of the ingredients in this salad, I quite enjoyed my first bite...but I must admit I wasn't initially sure it was rave-worthy.

And then, it happened.

I got seconds.  And then thirds.  And then fourths.  And next thing you know, I Ate. The. Whole. Thing.

Yep, two large containers of salsa and an avocado. I ate it all. In a single sitting.

I should be ashamed of myself. *blush*

So my advice to you is, try this only if there is other people around to share.  It is that good.

Click here for more recipes using Cinco de Mayo Salsas, available at the Pittsburgh Public Market during the winter and all around town during the farmers market season.

Saturday, March 17, 2012

Roasted Chickpeas

I bought some dried chickpeas last weekend and decided to roast them.  First the dried chickpeas had to be soaked for 12 hours (after which they expanded about 2.5 times their original size) and then simmered in boiling water for about an hour.  After they've been drained, cooled, and dried, I tossed them with olive oil, salt, garlic salt, ground cayenne pepper, and lots of smoked paprika.  Then I placed the chickpeas in a jelly roll pan and roasted them at 400°F.  I started checking on them after about 30 minutes.  For some reason, the chickpeas didn't roast evenly, so I had to start removing the ones that were done, stir the rest and continue roasting until they were done, checking occasionally, of course.  Great snack!

Roasted Chickpeas
Roasted Chickpeas

Saturday, March 10, 2012

Sweet Potato and Black Bean Chili

My third vegetarian meal this week was a Sweet Potato and Black Bean Chili.  Admittedly, I had to try this twice to get it right, but it was wonderful once I did.

Instead of canned black beans, I picked up 1/2 pound of dried beans from Crested Duck Charcuterie (they have a store in Beechview and are at the Pittsburgh Public Market on the weekends).  With dried beans, there was the additional steps of soaking and cooking them before they were ready to be added to the chili.

To soak the beans, I covered them with several inches of water and a little salt in a container and let them soak in the refrigerator overnight.

What 1/2 lbs of dried, pre-soaked black turtle beans looked like in my 6-cup container

They doubled in size after about 10 hours!

Beans, post-soaking, rinsing, and draining

I rinsed and drained the beans, and then placed them in a pot of boiling water to simmer for about 1.5 hours, skimming the foam at the top and checking towards the end to ensure doneness.  I also seasoned the beans with salt.

They were then ready to be added to the chili!  The first time I tried this recipe I thought it was a little bland, so this time I used twice the amount of ground chiptole chile recommended (so 1 tsp total) and put in two sweet potatoes instead of just one.  As a result of the additional sweet potato, I was also fairly generous with the amount I used of the other ingredients, for example, using 3 cups of water (instead of 2.5), juice from a whole lime (which is a little more than 4 tsp), and generally adding in a little more of each of the spices.  The final product was really good, and once tomatoes are back in season, I'd love to try this recipe with fresh tomatoes as well!

Sweet Potato and Black Bean Chili


Recipe courtesy of:
EatingWell (get the recipe here)

Friday, March 9, 2012

Beet Tacos with Arugula and Crunchy Tofu

I love beets.  No, I loooooove beets!  If they weren't so high maintenance, I'd be eating them all day, every day!

And who would have thunk that beets go well with fried tofu?  Well, apparently Leah Lizarondo over at Brazen Kitchen did.  For my second vegetarian meal this week, I made her "Turkmen Tacos": Beet Tacos with Arugula and Crunch Tofu.  I also like tofu, so I was very curious to try this recipe out.  The one change I made was using vegetable (soybean) oil instead of olive oil to fry the tofu, since the only kind of olive oil I have is extra-virgin which, from what I understand, isn't great for frying because of its lower smoke point.  I also didn't have vegenaise on hand so I used mayo, which means my version of the tacos was not vegan, but the recipe itself is.  The tortillas I used were fresh corn tortillas from Reyna Foods in the Strip District.  The result was fabulous, and surprisingly filling, too!

Beet Tacos with Arugula and Crunchy Tofu

Recipe courtesy of:
Brazen Kitchen (get the recipe here)

Thursday, November 24, 2011

Red Wine Cranberry Sauce

I love cranberry sauce with my Thanksgiving turkey.  Late last night (Thanksgiving eve), as my Sweet Potato with Toasted Pecans was baking in the oven, I asked R. if there was going to be cranberry sauce at Thanksgiving dinner.  He wasn't sure, so I volunteered to make some using another recipe I saw in China Millman's article in the Post-Gazette.  After all, the recipe only required three ingredients (fresh cranberries, sugar, dry red wine) and between R.'s mom and I, we had all three readily on hand.

Red Wine Cranberry Sauce

I thought the sauce turned out well, especially with the turkey.  The cranberries themselves remained quite tart, and I wonder if I could have used more sugar (I used 1-1/4 cups of raw sugar) and let the cranberries cook a little longer.  I might play around with this one again and see if I can get the right amount of sweetness going, but for today, I was happy with it.

Also check out the Sweet Potato with Toasted Pecans I made and photos of other dishes at our Thanksgiving dinner.

Recipe courtesy of:
China Millman, Pittsburgh Post-Gazette (article and recipe here)

Sunday, October 30, 2011

Roasted Pumpkin Seeds

A couple weekends ago when fall was still in full swing, R. and I went to Soergels Orchards with his dad and stepmom during its Fall Festival.  (Sadly, there was no running into TomKat on this particular day!)  The place was packed even though the Steelers game was about to start.  We walked around the stores and the grounds a bit and tasted some wine from Arrowhead Wine Cellars, but one of the main goals of this visit was to get a pumpkin.  I can't say that pumpkin carving is part of my own family's tradition, but R. really wanted to do it, so I obliged.  After about 15 minutes of searching, we found the perfect pumpkin and brought it home.

R. cut out the top and I helped him remove the seeds and the goop.  And then I had the honor of designing the face.  Honestly, I can't remember the last time I carved a pumpkin.  In fact, I can't remember if I've ever done it before.  Crazy, I know.  So given my limited experience, I decided to go with a simple and safe design:

My first jack-o-lantern that I can remember!

It works, no? ;)

Now what to do with the seeds?  R. called up his mom for help, who suggested paprika, garlic powder, salt, and olive oil.  So we laid the pumpkin seeds out on a cookie sheet and sprinkled on the various ingredients until the seeds looked well-seasoned.  We then baked the seeds at 250 degrees, checking and turning every 10 minutes, until the seeds were crunchy.  In all, it took about 40 minutes of baking time.

Roasted Pumpkin Seeds

The pumpkin seeds were glorious!  How could I have missed the tradition of pumpkin carving/seed roasting all these years?  I have to say, I was skeptical that I would enjoy carving a pumpkin, but it ended being quite a lot fun.

We'll have to do it again next year. :)  I might even try a fancier design for our jack-o-lantern!

Happy Hallowe'en!

Tuesday, August 30, 2011

Vegetarian Hosomaki (Slender Sushi Rolls)

Sushi is one of my favorite foods.  About 20 years ago when I was just a young lass, my older cousin got a sushi kit and made sushi at home.  I thought it was so cool and had always wanted to learn it myself.  It took a while for me to get there, but finally a few years ago I received (OK, requested) a sushi kit from R. for my birthday and started learning to make simple rolls.  After only a few attempts, however, I took a 2.5-year hiatus from making sushi for a number of reasons, one of which was that it is just hard to make sushi unless you are serving a large group of people as it is extremely time consuming and the sushi rice doesn't last very long so it isn't something you can save as a leftover.

Anyway, fast forward to a couple of weekends ago when I had my little ice cream gathering. I had promised appetizers, and I thought I would finally have the critical mass I needed to make some sushi rolls.  I went with the basic cucumber roll and sweet potato roll because my sushi-making skills were extremely rusty and this was not the time to try something complicated!

The first key to making good sushi is to make good sushi rice.  The recipe I use was adapted from different sources, mainly from the book that came with my sushi kit as well as this recipe from Food.com, and though I don't make it nearly often enough, it has served me well whenever I have made it.

SUSHI RICE

Specialized equipment you will need:
  • A wodden flat-bottom sushi rice bowl (looks like this), though a glass dish is OK as well.
Ingredients:
  • 1½ cups sushi rice
  • 1½ cups water
For vinegar mixture:
  • 3 tbsp rice vinegar
  • 1½ tbsp mirin (available at Japanese markets, but may also be found at your local supermarket)
  • 2¼ tbsp sugar
  • 1½ tbsp salt
Directions:
  1. Wash rice until water runs clear.
  2. Drain rice for 1 hour in the winter, 30 mins in the summer.
  3. Cook rice. (I use a rice cooker, but if you don't own one, follow the directions here.)
  4. Combine rice vinegar, mirin, sugar, and salt in a small saucepan and heat gently until the sugar dissolves, stirring constantly.
  5. Spread the cooked rice evenly in a shallow, flat-bottom wooden bowl or glass dish. Gently separate the grains with a spatula or a rice paddle and add the vinegar mixture at the same time. The rice should not be too moist.
  6. Fan the rice until it reaches room temperature. Don't let it get too cool or it won't stick as well.
Note that sushi rice only lasts one day, so it should not be made ahead.

Sushi rice is not just for traditional sushi rolls or nigiri, but can be enjoyed in other ways as well. Scatter fish over a bowl of sushi rice to make chirashi. I sometimes serve it with grilled salmon.


OK, now that you have the rice, how do you make the sushi rolls?  I describe what I did in the directions below, which is a combination of techniques I learned from the book that came with my sushi kit, various web sources (such as this one), and observations of my own.

VEGETARIAN HOSOMAKI (SLENDER SUSHI ROLLS)


Specialized equipment you will need:
  • Bamboo rolling mat, wrapped in saran wrap (but check this out)
  • A sharp knife
Ingredients:


For hosomaki:
  • Desired filling (e.g., cucumber, sweet potato, avocado, asparagus, carrot, etc. Clearly it is possible to use raw fish for a non-veggie version, but be sure to use properly-frozen sushi grade fish.)
  • 4-5 sheets of seaweed
  • wasabi
For hosomaki preparation:
  • Rice vinegar and water mixture (to seal the rolls and to moisten hands and knife so rice doesn't stick)
Condiments (should be available at your local supermarket):
  • Japanese soy sauce
  • wasabi (optional)
  • pickled ginger (optional; used to cleanse palate)
Directions for rolls:
  1. Prepare sushi rice according to recipe above.
  2. Cook filling if necessary. Cut the filling into long strips.
  3. Wrap bamboo mat with saran wrap (this prevents the rice from sticking to the mat which makes it hard to clean). Place mat on a dry chopping board. The bamboo sticks should be aligned horizontally (so you can roll the sushi forward).
  4. Divide rice into 8 to 9 equal parts.
  5. Divide a sheet of seaweed in half.
  6. Place the halved sheet of seaweed horizontally on the bamboo mat, with the shiny-side faced down.
  7. Dip hands in vinegared water mixture. Spread one part of rice on seaweed evenly and gently. At the far end of the seaweed, leave about a 1-inch space free of rice.  Be careful not to use too much rice or the roll won't stick to itself!
  8. If desired, run a little wasabi along the rice at the end closest to you. Place desired filling on top of the wasabi.
  9. Wet the strip of seaweed not covered in rice with vinegared water mixture.
  10. Lift the front of the bamboo mat closest to you and roll the sushi. Tighten the roll by pressing firmly. The roll will stick to itself once you're done rolling.
  11. Release the roll and let it sit for a few minutes.  (This makes it easier to cut.)
  12. Run vinegared water along the cutting edge of a sharp knife. Cut the roll evenly into six pieces. (It's easier to first cut the roll in half and then each half into three even pieces.)
  13. Repeat until you're done with all the ingredients.
Yields: 8-9 rolls (48-54 pieces)


Vegetarian Hosomaki

Notes to self:
  • It takes time to figure out how to make presentable sushi, but practice makes perfect!
  • If the roll is too full, it won't stick to itself, so try using less rice. It took a lot of experimenting for me before I figured out the most appropriate amount of rice to use, and still I would keep making mistakes.
  • The vinegared water is the secret to not having rice all over your hands. It is also very important to dab it on your knife before cutting each roll; otherwise, it won't cut well.
  • Not all soy sauce is the same. Make sure you eat sushi with Japanese soy sauce, not Chinese soy sauce!
  • Not all chopsticks are the same. Compared to Chinese chopsticks, Japanese chopsticks are shorter and have tapered ends (as opposed to the blunt ends on Chinese chopsticks) that make them easier to pick up delicate foods such as pickled ginger.

Vegetarian Hosomaki
Vegetarian Hosomaki
It took a while to get a few pieces that looked somewhat presentable...  I need more practice!

Though aesthetically my sushi rolls left something to be desired due to lack of practice, and it took all afternoon and many failures to make enough for my party, at least these rolls tasted pretty darn good.  Guests enjoyed them a lot, which is the most important thing. :)

    Tuesday, July 26, 2011

    Soba Noodles with Red Chard, Raisins and Toasted Pine Nuts

    I was intrigued the first time I saw this recipe on a blog I happened upon a few months ago.  I had never cooked with or eaten Swiss chard before, but the combination of soba noodles with raisins and pine nuts sounded pretty good, so I thought I'd give it a try.  The first time I cooked it I screwed up the soba noodles by overcooking them (that was dumb!) and it turned into a gigantic glob of gooey mess.  Yuck.  Whatever you do, don't overcook soba noodles.  I tried again the following week and the dish was successful - a simple but solid combination of sweet and salty flavors.  It was an enjoyable and easy-to-make dish.

    Soba Noodles with Red Chard, Raisins and Toasted Pine Nuts
    Soba Noodles with Red Chard, Raisins and Toasted Pine Nuts

    Recipe courtesy of:
    Linden and Rosemary (get the recipe here)

    Tuesday, July 5, 2011

    Cherry Tomato Salad

    Cherry Tomato Salad
    Cherry Tomato Salad

    Believe or not, I actually like salads a lot, but I never seem to like anything I make at home, which explains the lack of salad entries on this blog. This Cherry Tomato Salad is one of the few rare exceptions. Those who follow me on Twitter or Facebook (yes, I've finally set up a Facebook page! Check it out and "like" it to get updates!) will recognize this as the same salad featured in my profile picture.  Partly because it is colorful and pretty, but also because it is quite tasty (if you like olives), with a balanced mix of sweetness, saltiness, and tartness.  If there is a large bowl of this salad in front of me, you can bet that I'll eat it all before I even realize it!  I hadn't made this in a long time, actually, but this week I just felt like something different and refreshing, and this just so happened to fit the bill perfectly.

    Recipe courtesy of:
    Allrecipes (get the recipe here)

    Monday, May 16, 2011

    Tofu with Red Curry Paste, Peas, and Yellow Tomatoes

    Tofu with Red Curry Paste, Peas, and Yellow Tomatoes
    Tofu with Red Curry Paste, Peas, and Yellow Tomatoes

    I think I have declared my love for curry (of almost all kinds) on this blog before, so naturally I collect a disproportionately large number of recipes featuring this spice.  They don't always end up making it to my honor roll of blog-worthy recipes, but here is one from Cooking Light that I'm glad I finally got to try last week (particularly because I also like tofu) and really enjoyed.  The different ingredients balance each other out quite well, but the coconut milk really makes the sauce stand out.  I had used two heaping tablespoons of red curry paste, and it does pack a lot of heat.  This dish is also incredibly quick and easy to make, which always means bonus points in my book because I have so little time to cook sometimes.  In fact, I actually had to rush out the door the day I decided to make this for dinner, and I was able to prepare the sauce, take several pictures, and eat it all in the span of 30 minutes. (The only exception was the rice which takes close to an hour in a rice cooker.  Luckily, I had thought ahead and had started the rice cooker well before I started making the rest of the dish.) 

    I'm filing this one under "must make again." :)

    Recipe courtesy of:
    Cooking Light (get the recipe here)