Showing posts with label recipes - Asian/Asian inspired. Show all posts

Wednesday, February 3, 2016

Grandma's Chiu Chow (Teochew) Deep Fried Shrimp Balls

Chiu Chow Deep Fried Shrimp Ball
Chiu Chow Deep Fried Shrimp Balls

This is a bittersweet post for me. It is also the reason I have reemerged from my blogging hiatus.

My 90-year-old paternal grandmother, whom we called Ah Ma, passed away three-and-a-half weeks ago. In addition to being sweet like grandmas can be, my memories of Ah Ma largely revolve around food. When I was younger, every time Ah Ma would cook a whole chicken for dinner she'd save me one of the legs because that was my favorite cut of the chicken. Even when she wasn't cooking, she would constantly ask if I was hungry and would practically force feed me regardless of what my answer was. Food was her way of showing love.

It makes sense though, of course, as Ah Ma was the chef in the family. Every time we visited her and Yeh Yeh (grandpa) for the holidays, she would cook up a feast of traditional dishes from their native Chiu Chow (Teochew) city in China. We're talking a specialty local cuisine that you can't order at typical Chinese restaurants! There was a variety of dishes she made, and embarrassingly I cannot remember most of them now, because as a kid there was only one dish that really mattered as far as I was concerned: Ah Ma's deep friend shrimp balls.

It wasn't just me though. Everybody else in the family loved those shrimp balls, too!

Back in 2009, perhaps sensing a need to preserve our family tradition, I asked Ah Ma to show me how to make her shrimp balls. I had posted the recipe on my old blog back then, but I have since made this myself a few times, and I can now present the improved version—a combination of Ah Ma's original recipe with my own tips and proportions added.

Since Ah Ma moved back to Hong Kong a few years ago (a place she had called home for several decades before moving to Canada in the 1990's), I have been the one who has taken on the responsibility of making Ah Ma's shrimp balls for my family's holiday gatherings. It is the one tradition that I really cherish, and hopefully I will get to pass it on to my own granddaughter someday.

Ingredients:
  • 1 lb uncooked shrimp, peeled
  • 4 fresh water chestnuts, peeled and chopped, or about 6-8 chopped if using the canned variety (the larger the chopped pieces, the crunchier the shrimp balls will be)
  • ¼ lbs chuck ground pork (optional—I usually skip this as it is hard to find in my area)
  • 1 shallot, minced
  • 1 egg
  • ¼-½ tsp salt (depending on desired level of saltiness)
  • ¼-½ tsp white pepper
  • ¼-½ tsp chicken powder (Knorr brand Chicken broth mix or Lee Kum Kee brand Chicken bouillon powder)
  • Corn oil or vegetable oil (a lot)
  • ½ cup flour (I use all-purpose)

Directions:

Mash shrimp using the flat part of a cleaver. That’s what my grandma would do anyway, but I have since discovered that processing the shrimp in a food processor makes the job a whole lot easier!

In a large bowl, combine the mashed shrimp, water chestnuts, ground pork, shallot, eggs, salt, pepper, and chicken powder. Mix well. My grandma would say to stir only in one direction (i.e., if you started stirring counterclockwise, do not reverse and stir clockwise), but I really don’t think it matters.

Add flour and mix to combine. Do not overmix.

Heat oil on high in a wok or a deep skillet. The amount of oil used depends on the size of your wok/skillet and the size of the shrimp balls. In general, use enough oil to cover half the diameter of the shrimp balls – for example, if your shrimp balls are 1” in diameter, then fill wok ½” deep with oil. Once the oil is boiling, reduce heat to medium high.

Mold the shrimp batter into rounded tablespoons. Dip a spoon into a small bowl of water before scooping the shrimp balls and placing it into the oil-filled wok (this prevents the shrimp balls from sticking to the spoon).* Alternatively (and this is what I do), use a 1½-inch melon baller or cookie scoop to make evenly spherical balls. Roll the shrimp balls around in the wok so they fry evenly on all sides. Fry until golden brown, about 5 minutes. Drain shrimp balls before serving.

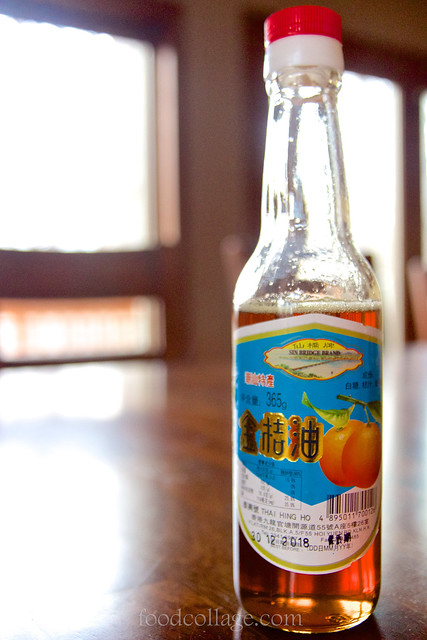
Shrimp balls are traditionally served with a tangerine sauce that is not available in North America. The closest store-bought sauce I have found is a golden plum sauce, though a sweet and sour sauce could possibly work as well. Nothing beats the real thing though! My dad got me a bottle of tangerine sauce from Hong Kong and it only has three ingredients so I'm going to see if I can make a homemade version. Will update if successful!

Yields about 24 shrimp balls.

*Ah Ma had this crazy cool technique of massaging and squeezing the shrimp mixture into perfect little round balls. I don't know how she did it because my attempts are never anywhere near the right shape (which is why I cheat by using a melon baller instead), but I'm glad I documented her kickass technique in a video:


Chiu Chow Deep Fried Shrimp Ball Batter
Shrimp batter (makes about 24)


Forming Chiu Chow Deep Fried Shrimp Balls with a Melon Baller
Using a melon baller to form the shrimp balls


Deep Frying Chiu Chow Shrimp Balls
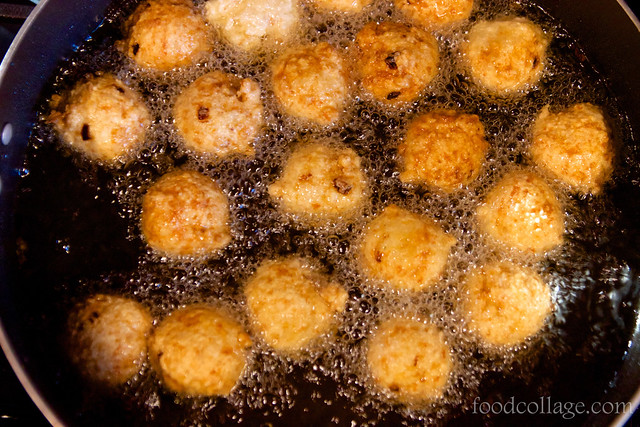
Shrimp balls in the midst of deep frying


Chiu Chow Deep Fried Shrimp Balls
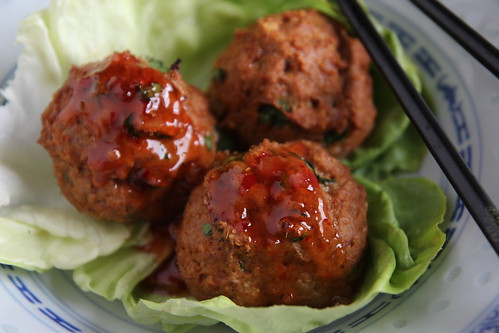
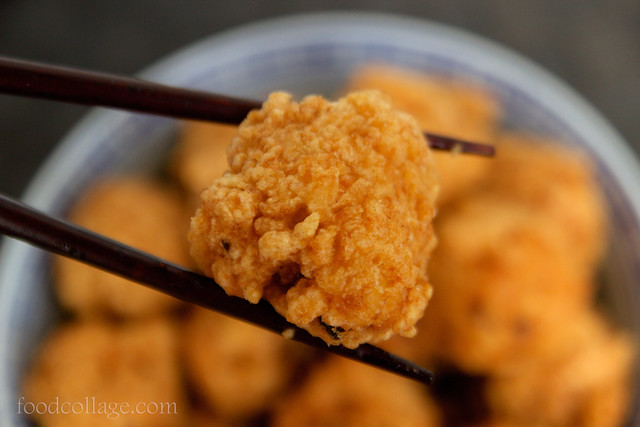
The finished product


Tangerine Sauce for Chiu Chow Deep Fried Shrimp Balls
Tangerine sauce served with shrimp balls

Thursday, May 16, 2013

Venison Bibimbap

Slowly but surely, we've been chipping away at our seemingly endless supply of venison. Still, we had an abundance of ground venison and one can only make so many ground venison pizzas without getting bored! Then, a friend of mine who has been experimenting with venison cooking himself suggested marinating ground venison in bulgogi sauce and then making bibimbap with it. Now there's an idea!

Bibimbap is a classic Korean dish that is basically white rice topped with vegetables, meat, and an egg cooked over easy, which you break and mix in with the rest of the ingredients before consuming. I've only had bibimbap in Korean restaurants and never even came close to attempting it myself. Luckily, I discovered Maangchi.com, a website with a massive collection of authentic Korean recipes that is run by a New York transplant who was originally from Korea. It didn't take too much digging before I found a bibimbap recipe.

But first, I had to make a marinade. Although I had made bulgogi before using a different recipe, I decided to try Maangchi's just for variety's sake. I then marinated the ground venison in the bulgogi sauce overnight in the fridge.

The next day, I made some rice in the rice cooker and prepared the veggies, which included shredded carrots, about 10-15 shiitake mushrooms, 4 small zucchinis, a package of fern brakes (also known as kosari and available at Korean supermarkets), bean sprouts, and spinach. Of course the combination of veggies is not set in stone, but I wanted to follow the recipe exactly in order to replicate the authentic flavor. I did double Maangchi's recipe as I had double the amount of meat.

Ingredients for Venison Bibimbap
Veggies for the bibimbap: (L-R) Shredded carrots, shiitake mushroom,
julienned zucchini, fern brakes (kosari), bean sprout, spinach

A huge part of making bibimbap involves arranging the bowl in an attractive manner. I don't know that I did a great job with that, as I apparently fail at cooking eggs over easy without breaking the yolk (I tried multiple times, and it was just not meant to be for this non-egg eater!), and I completely forgot to add the gochujang (Korean hot pepper sauce) before snapping the photo!  But for what it's worth, here's my bibimbap (the rice is at the bottom):

Venison Bibimbap
Venison Bibimbap

Because of all the different ingredients that required preparation, I found the bibimbap to be rather high maintenance and time consuming. It was worth the attempt though, as it was very tasty, and the ground venison which was slightly sweetened from the bulgogi marinade was astoundingly delicious. Though I may be too busy to make this on a regular basis, it was great to have discovered another way to use ground venison.

Recipe courtesy of:
Maangri.com (get the bulgogi recipe here and the bibimbap recipe here)

Monday, April 29, 2013

Chinese Fried Rice with Shrimp and Venison Kielbasa

Pittsburghers will probably find this surprising, but I was well into my twenties before I had even heard of kielbasa for the first time, let alone taste it. That momentous "first time" was at a holiday gathering with R.'s family in the Pittsburgh area well before I moved here, and I remember liking the juiciness of the kielbasa and the tanginess of the sauerkraut that went along with it. It took me awhile, however, to realize the prominent place that kielbasa holds in "Pittsburghese cuisine," if there is such a thing.

Now that we are locals ourselves, it seemed fitting to have some of our venison made into kielbasa. We brought some along to a Steelers game tailgate back in December, but I was wholly disappointed by the dryness of the sausage - it was nothing like the juicy stuff I remember from that family holiday party!

While the venison kielbasa did not resemble what I know to be kielbasa, it did remind me a little bit of lap cheong - a Chinese sausage that's smoked and also very dry. (That's about where the resemblance ends, though.)

I decided to pull out an old Chinese fried rice recipe that my dad gave me eons ago and tried it with sliced venison kielbasa substituting for lap cheong. It worked out well, adding a rich layer of flavor to the fried rice.  I'm not sure we'll be getting venison kielbasa again, but if we do, this is what I will be making with it.

Venison Kielbasa
Venison kielbasa

Chinese Fried Rice with Shrimp and Venison Kielbasa

Chinese Fried Rice with Shrimp and Venison Kielbasa

Ingredients:
  • 1½ cup long-grain white rice
  • ½ lb venison kielbasa
  • ½ lb shrimp, peeled
  • 4 eggs, beaten
  • ½ cup frozen green peas
  • 1 bunch scallions, chopped
  • ½ lb fresh pineapple chunks
  • 2 tbsp peanut oil, divided (may substitute with canola oil or corn oil)
  • Salt, to taste
  • 2 tbsp Chinese soy sauce
  • 1 tbsp sesame oil (optional)
  • Sriracha sauce (optional, but highly recommended)
  • Fermented bean curd (optional; available in jars at Chinese supermarkets)
Directions:
  1. Cook rice in rice cooker or according to package directions. Let cool before frying. (Better yet, cook a day ahead to let the rice dry some before frying.)
  2. Preheat oven to 350˚F. Place kielbasa in a pan and cover with aluminum foil. Roast for 15-20 minutes, until done. Slice kielbasa using a serrated knife. Spray a skillet with cooking spray and heat on medium high, and cook each side of the kielbasa slices for 2-3 minutes.
  3. Cook green peas according to package directions.
  4. Wash and season shrimp with salt and pepper. In a wok or a skillet, fry shrimp in 1 tbsp peanut oil for about 3 minutes. Remove shrimp from wok/skillet and drain excess liquid.
  5. In the wok/skillet, add 1 tbsp peanut oil, and fry ¾ of the eggs under high heat; chop them with a spatula as you fry. Add salt to taste.
  6. Lower heat to medium, add rice and cook. Add 2 tbsp soy sauce, 1 tbsp sesame oil, and salt to taste.
  7. Add kielbasa, shrimp, green peas, scallion, pineapples, and the remainder of the eggs. Mix well and fry for 3-5 minutes.
  8. Serve with Sriracha sauce and/or fermented bean curd.
Yields 4-5 servings

Monday, April 22, 2013

Venison Bulgogi

One of the cuts of venison we got from my husband's kill was simply marked "steak" on the package. Now when I think steak, I think beef sirloin or filet mignon, so naturally I had assumed that this would be a similar cut. Once thawed, however, I discovered that it was more like bone-in flank steak, with tendons running down the length of the meat. As venison is already a tougher meat, it looked like the only way to enjoy the steak was to slice it thinly across the grain and marinate the heck out of it.

So the next question was, how does one serve meat this way? Well, like Korean bulgogi!

I found this great bulgogi sauce recipe online and used it to marinate my meat overnight. Once the meat is marinated, I cooked it on a preheated, oiled grill (pan frying in an oiled skillet under high heat works too) until slightly charred on both sides. I served it with rice, topped with more bulgogi sauce (I made a second serving for the topping).

Venison marinating in bulgogi sauce


Venison Bulgogi
Venison Bulgogi

Super delicious!

Recipe courtesy of:
Savory Sweet Life (get the recipe here)

Monday, May 7, 2012

Thai Red Curry Turkey Meatballs

I happened upon this Thai Red Curry Turkey Meatballs recipe in The Perfect Pantry blog a little while ago and immediately knew I had to try making it myself!  I think they turned out quite good.

The only mistake I made was overseasoning the meatballs!  The recipe had stated that ground turkey tends to be bland, so I did not hold back.  Turns out I should have heeded the advice to use just half of seasoning and add more after tasting.  These meatballs had a particularly strong curry flavor, and they were spicy too, even though I didn't expect them to be.  I might have to use a little less curry paste next time along with less salt.  Still, I was quite happy with them.  I paired the meatballs with a simple curry rice (just jasmine rice with  Madras curry powder and raisins added before cooking) and it was delicious.

Thai Red Curry Turkey Meatballs

Recipe Courtesy of:
The Perfect Pantry (get the recipe here)

Tuesday, August 30, 2011

Vegetarian Hosomaki (Slender Sushi Rolls)

Sushi is one of my favorite foods.  About 20 years ago when I was just a young lass, my older cousin got a sushi kit and made sushi at home.  I thought it was so cool and had always wanted to learn it myself.  It took a while for me to get there, but finally a few years ago I received (OK, requested) a sushi kit from R. for my birthday and started learning to make simple rolls.  After only a few attempts, however, I took a 2.5-year hiatus from making sushi for a number of reasons, one of which was that it is just hard to make sushi unless you are serving a large group of people as it is extremely time consuming and the sushi rice doesn't last very long so it isn't something you can save as a leftover.

Anyway, fast forward to a couple of weekends ago when I had my little ice cream gathering. I had promised appetizers, and I thought I would finally have the critical mass I needed to make some sushi rolls.  I went with the basic cucumber roll and sweet potato roll because my sushi-making skills were extremely rusty and this was not the time to try something complicated!

The first key to making good sushi is to make good sushi rice.  The recipe I use was adapted from different sources, mainly from the book that came with my sushi kit as well as this recipe from Food.com, and though I don't make it nearly often enough, it has served me well whenever I have made it.

SUSHI RICE

Specialized equipment you will need:
  • A wodden flat-bottom sushi rice bowl (looks like this), though a glass dish is OK as well.
Ingredients:
  • 1½ cups sushi rice
  • 1½ cups water
For vinegar mixture:
  • 3 tbsp rice vinegar
  • 1½ tbsp mirin (available at Japanese markets, but may also be found at your local supermarket)
  • 2¼ tbsp sugar
  • 1½ tbsp salt
Directions:
  1. Wash rice until water runs clear.
  2. Drain rice for 1 hour in the winter, 30 mins in the summer.
  3. Cook rice. (I use a rice cooker, but if you don't own one, follow the directions here.)
  4. Combine rice vinegar, mirin, sugar, and salt in a small saucepan and heat gently until the sugar dissolves, stirring constantly.
  5. Spread the cooked rice evenly in a shallow, flat-bottom wooden bowl or glass dish. Gently separate the grains with a spatula or a rice paddle and add the vinegar mixture at the same time. The rice should not be too moist.
  6. Fan the rice until it reaches room temperature. Don't let it get too cool or it won't stick as well.
Note that sushi rice only lasts one day, so it should not be made ahead.

Sushi rice is not just for traditional sushi rolls or nigiri, but can be enjoyed in other ways as well. Scatter fish over a bowl of sushi rice to make chirashi. I sometimes serve it with grilled salmon.


OK, now that you have the rice, how do you make the sushi rolls?  I describe what I did in the directions below, which is a combination of techniques I learned from the book that came with my sushi kit, various web sources (such as this one), and observations of my own.

VEGETARIAN HOSOMAKI (SLENDER SUSHI ROLLS)


Specialized equipment you will need:
  • Bamboo rolling mat, wrapped in saran wrap (but check this out)
  • A sharp knife
Ingredients:


For hosomaki:
  • Desired filling (e.g., cucumber, sweet potato, avocado, asparagus, carrot, etc. Clearly it is possible to use raw fish for a non-veggie version, but be sure to use properly-frozen sushi grade fish.)
  • 4-5 sheets of seaweed
  • wasabi
For hosomaki preparation:
  • Rice vinegar and water mixture (to seal the rolls and to moisten hands and knife so rice doesn't stick)
Condiments (should be available at your local supermarket):
  • Japanese soy sauce
  • wasabi (optional)
  • pickled ginger (optional; used to cleanse palate)
Directions for rolls:
  1. Prepare sushi rice according to recipe above.
  2. Cook filling if necessary. Cut the filling into long strips.
  3. Wrap bamboo mat with saran wrap (this prevents the rice from sticking to the mat which makes it hard to clean). Place mat on a dry chopping board. The bamboo sticks should be aligned horizontally (so you can roll the sushi forward).
  4. Divide rice into 8 to 9 equal parts.
  5. Divide a sheet of seaweed in half.
  6. Place the halved sheet of seaweed horizontally on the bamboo mat, with the shiny-side faced down.
  7. Dip hands in vinegared water mixture. Spread one part of rice on seaweed evenly and gently. At the far end of the seaweed, leave about a 1-inch space free of rice.  Be careful not to use too much rice or the roll won't stick to itself!
  8. If desired, run a little wasabi along the rice at the end closest to you. Place desired filling on top of the wasabi.
  9. Wet the strip of seaweed not covered in rice with vinegared water mixture.
  10. Lift the front of the bamboo mat closest to you and roll the sushi. Tighten the roll by pressing firmly. The roll will stick to itself once you're done rolling.
  11. Release the roll and let it sit for a few minutes.  (This makes it easier to cut.)
  12. Run vinegared water along the cutting edge of a sharp knife. Cut the roll evenly into six pieces. (It's easier to first cut the roll in half and then each half into three even pieces.)
  13. Repeat until you're done with all the ingredients.
Yields: 8-9 rolls (48-54 pieces)


Vegetarian Hosomaki

Notes to self:
  • It takes time to figure out how to make presentable sushi, but practice makes perfect!
  • If the roll is too full, it won't stick to itself, so try using less rice. It took a lot of experimenting for me before I figured out the most appropriate amount of rice to use, and still I would keep making mistakes.
  • The vinegared water is the secret to not having rice all over your hands. It is also very important to dab it on your knife before cutting each roll; otherwise, it won't cut well.
  • Not all soy sauce is the same. Make sure you eat sushi with Japanese soy sauce, not Chinese soy sauce!
  • Not all chopsticks are the same. Compared to Chinese chopsticks, Japanese chopsticks are shorter and have tapered ends (as opposed to the blunt ends on Chinese chopsticks) that make them easier to pick up delicate foods such as pickled ginger.

Vegetarian Hosomaki
Vegetarian Hosomaki
It took a while to get a few pieces that looked somewhat presentable...  I need more practice!

Though aesthetically my sushi rolls left something to be desired due to lack of practice, and it took all afternoon and many failures to make enough for my party, at least these rolls tasted pretty darn good.  Guests enjoyed them a lot, which is the most important thing. :)

    Monday, July 18, 2011

    Chicken Satay Stir-Fry with Orange Scented Jasmine Rice (Rachael Ray Recipe)

    I discovered this Rachael Ray recipe a few years ago and it's one of the best things I've ever made!  While Rachael Ray lists this recipe under "30 Minute Meals," it really takes a lot longer than that if you lack the luxury of having kitchen minions doing all the chopping for you (or maybe I'm just slow). :-/  However, once you get down to it, it's not that difficult to make, and totally worthwhile.  The first time I tried this recipe was also one of the few times R. and I cooked together, and we were both blown away by the result.  R. even called it "restaurant quality"!  Personally, I love the orange-ginger combination, and throwing orange zest in the rice was just an absolutely brilliant idea.  I have a sweet little rice cooker, so instead of following the directions on the recipe, I just put the orange right in with the rice, and it comes out perfectly every time.  Yum!

    Chicken Satay Stir-Fry with Orange Scented Jasmine Rice
    Chicken Satay Stir-Fry with Orange Scented Jasmine Rice


    Recipe courtesy of:
    Rachael Ray on the Food Network (get the recipe here)

    Thursday, June 2, 2011

    Chicken Tikka Masala (Aarti Sequeira Recipe)

    Ever since I attended Aarti Sequeira's cooking demo back in March, I had wanted to try some of her recipes.  Indeed, this was one of my goals for the summer.  I finally had the opportunity to do so last week when I tried her Chicken Tikka Masala, and all I can say is WOW!  It was by far one of the best things I've ever produced in my kitchen (and I've never made Indian food before).  Probably even better than what I've had at Indian restaurants, and R. was equally blown away as well.  The curry sauce was absolutely the perfect blend of tomatoey-tangy goodness with hints of ginger, garlic, and peppers.  Aarti's directions are also easy to follow.  Really, this dish made me feel Indian!  I can't wait to try more of her recipes...or make this one again.


    Chicken Tikka Masala
    Chicken Tikka Masala

    Recipe courtesy of:
    Aarti Sequeira on the Food Network (get the recipe here)

    Monday, May 16, 2011

    Tofu with Red Curry Paste, Peas, and Yellow Tomatoes

    Tofu with Red Curry Paste, Peas, and Yellow Tomatoes
    Tofu with Red Curry Paste, Peas, and Yellow Tomatoes

    I think I have declared my love for curry (of almost all kinds) on this blog before, so naturally I collect a disproportionately large number of recipes featuring this spice.  They don't always end up making it to my honor roll of blog-worthy recipes, but here is one from Cooking Light that I'm glad I finally got to try last week (particularly because I also like tofu) and really enjoyed.  The different ingredients balance each other out quite well, but the coconut milk really makes the sauce stand out.  I had used two heaping tablespoons of red curry paste, and it does pack a lot of heat.  This dish is also incredibly quick and easy to make, which always means bonus points in my book because I have so little time to cook sometimes.  In fact, I actually had to rush out the door the day I decided to make this for dinner, and I was able to prepare the sauce, take several pictures, and eat it all in the span of 30 minutes. (The only exception was the rice which takes close to an hour in a rice cooker.  Luckily, I had thought ahead and had started the rice cooker well before I started making the rest of the dish.) 

    I'm filing this one under "must make again." :)

    Recipe courtesy of:
    Cooking Light (get the recipe here)

    Tuesday, May 10, 2011

    Honey Jalapeno Chicken with Sesame Soba Noodles

    I came across this recipe from a friend's blog a couple years ago and I've been a big fan of it since the very first time I tried it.  The soba noodles are seasoned with soy sauce, sesame oil, and pickled ginger, which is just a heavenly combo, and I love rotisserie chicken and how well it goes with the honey-jalapeno-cilantro sauce.  The ease of preparation wins another bonus point from me!

    Honey Jalapeno Chicken with Sesame Soba Noodles
    Honey Jalapeno Chicken with Sesame Soba Noodles
     
    Recipe courtesy of:
    Food Network (get the recipe here)

    Saturday, April 23, 2011

    Singapore Mai Fun (Singapore Rice Noodles)

    Just a quick post and a little bit belated, but I made this a couple of weeks ago as part of my "cleanse" diet.  I had mentioned in a previous post that sometimes I just feel like my body needs a healthy, homemade meal to balance out all the high-calorie meals I consume when I eat out.  At 237 calories per serving, this Singapore Mai Fun ("mai fun" is Chinese for rice noodles) recipe definitely fits the bill.  I'm also pretty busy this time of year (well, really, most times of the year...), so meals I make at home, like this one, tend towards the easy but tasty.  This Singapore Mai Fun is a little bit spicy and really delicious.  Personally, I think it's better than take-out, and definitely healthier!

    Singapore Mai Fun
    Singapore Mai Fun

    Recipe courtesy of:
    Cooking Light (get the recipe here)

    Sunday, April 17, 2011

    Vegetable Fried Rice

    Ever feel like you've been eating way too much unhealthy foods and you just need to spend a few days "cleansing"?  I don't mean doing one of those extreme, gimmicky detox diets, of course; I mean eating lower-calorie foods for a few days to balance things out a bit.  I feel that way a lot these days after bingeing on restaurant meals that are more delicious than they are healthy.  The vegetable fried rice is one of my super easy go-to recipes when I feel like going meatless and relatively low-calorie (only 364 calories).


    Vegetable Fried Rice
    Vegetable Fried Rice


    The only problem I have with this recipe as is is that it calls for instant brown rice.  I'm sorry, but no respectable recipe should list instant-anything as an ingredient, and IMHO instance rice is as nasty as it goes.  So I use regular long-grain rice, usually jasmine rice because that's what I tend to stock at home, and not to brag or anything but I do own a really fabulous Zorijushi rice cooker that I'm totally in love with, so I skip the saucepan method and cook the rice in my rice cooker instead and it comes out perfect every time.  Sometimes I also add a splash of curry powder at the end for a little extra flavor.

    Recipe courtesy of:
    Eating Well (get the recipe here)