Showing posts with label recipes - main course. Show all posts

Thursday, August 15, 2013

Venison Roast with Spiced Blueberry Chutney

Our stash of venison included a 3-1/2 pound roast. While at the Berry Patch when they were still at the Pittsburgh Public Market earlier this year, we had sought advice on what would go well with a venison roast, and the hot blueberry jam was recommended to us.

A little googling led me to this Herbal Roasted Venison with Spiced Blueberry Chutncy recipe that sounded pretty good. I made a few adjustments, incorporating the hot blueberry jam into the marinade and the chutney, using fresh instead of frozen blueberries, and skipping the juniper berries (only because I didn't have any). This is what I came up with:

Ingredients:

1 (3-4 lb) venison roast

Herb Rub:

fresh rosemary leaves, about 6 springs
fresh thyme leaves, to taste
2 cloves garlic
2 tablespoons coarse salt

Marinade:

1-1/2 cup red wine
1/4 cup olive oil
1/4 cup hot blueberry jam

Spiced Blueberry Chutney

3 oz hot blueberry jam
6 oz fresh blueberries
1 large onion, peeled and finely chopped
1/4 cup red wine vinegar
2 tbsp cup sugar
1 oz raisins
2 tbsp minced fresh ginger
1 large clove garlic, peeled and minced
1 tbsp curry powder
1/2 teaspoon salt
3 tablespoons chopped fresh mint

Directions:

Using a small knife, make slits all over the roast.

Mix herb rub ingredients in a food processor and rub the mix into the roast.

Mix marinade together and pour into a 1 gallon Ziplock bag. Place roast inside the bag, zip it tightly, and swish it around to make sure the marinade covers all sides of the roast. Place in a bowl and marinade overnight in refrigerator. Turn roast around during the marinade process for even coverage.

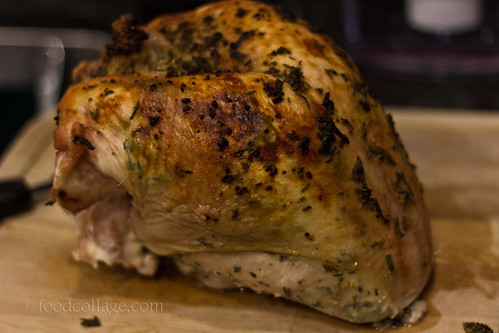
Preheat oven to 325˚F. Place roast in a roasting pan, cover, and roast 20 minutes per pound. Uncover, increase heat to 375˚F, and roast until desired doneness. (For me, it took another 35 minutes to get to medium.)

In the meantime, mix all chutney ingredients but the mint in a stock pot and bring to a boil. Lower heat and simmer until thickened, about 12-15 minutes, stirring occasionally to prevent sticking. Let cool, and stir in mint. Serve with roast.

Hot blueberry jam from The Berry Patct
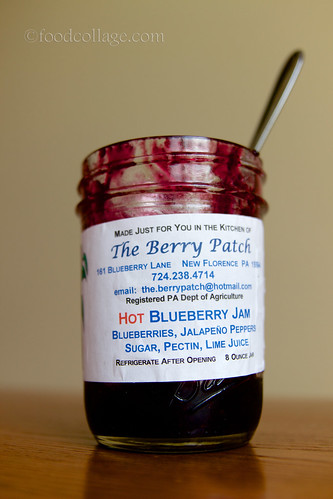
Hot blueberry jam from the Berry Patch

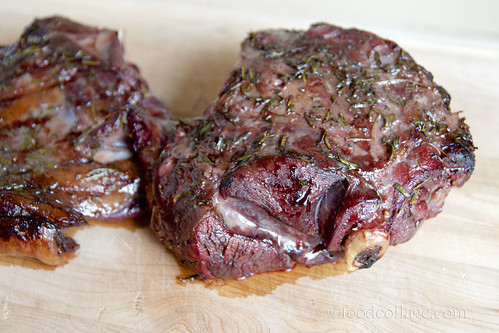
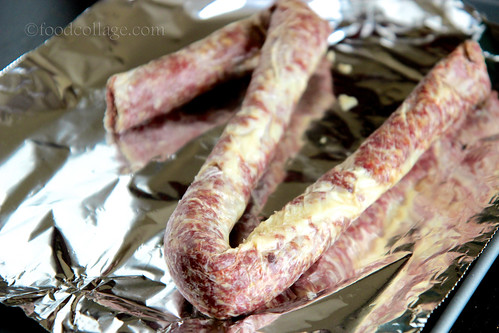
Venison marinating in herb rub and blueberry marinade

Venison Roast with Spiced Blueberry Chutney
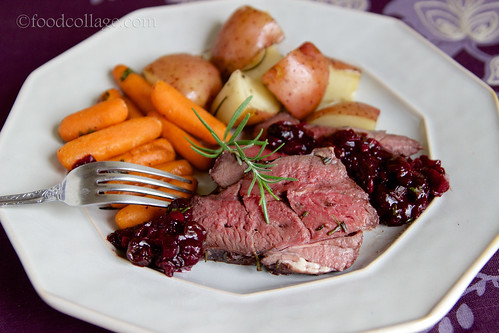
Venison Roast with Spiced Blueberry Chutncy

We only had one venison roast, so I suppose I won't be making this exact dish again for a while, but it was delicious and I suspect the spiced blueberry chutney would go well with steaks or other types of roasts.

Recipe adapted from:
Seattle Times (get the original recipe here)

Monday, August 5, 2013

Venison Bulgogi (Take 2)

I had attempted venison bulgogi before, but when I made venison bibimbap, I discovered another bulgogi sauce recipe that served as an excellent marinate for the bibimbap so I thought I'd try it as is. I made two batches—one used to marinate the thinly sliced venison steak overnight and the other as a sauce for serving. It was tasty! I wouldn't say this was better or worse than the other recipe I tried, but this is a bit sweeter with the inclusion of pears.  It's been fun getting into Korean cooking, and the flavors work really well with our large (though slowly dwindling, finally) supply of venison!

Venison Bulgogi
Venison Bulgogi

Recipe courtesy of:
Maangchi.com (get the recipe here)

Friday, May 17, 2013

Three Meat Chili

Three Meat Chili
Three Meat Chili with ground venison, beef sirloin steak, and Italian pork sausage

In addition to all the venison, we also recently got some 20+ pounds of grass-fed beef from a cow we shared with family. To be honest, I was vehemently against the cow-sharing idea, because I don't normally eat this much red meat and we already have way too much meat for two people, but somehow the beef landed in our freezer anyway...

So what to do with all this chow? A friend suggested a particularly meat-heavy Paleo Chili recipe from Paleo Table, so I thought I'd give it a try. The recipe calls for ground beef, sirloin steak, and Italian sausage, but I substituted the ground beef with ground venison instead. I can't quite claim that the chili I made is Paleo since I used regular, dairy-containing sour cream, so I thought the name "Three Meat Chili" would be more appropriate, because my version uses three kinds of meat: venison, beef, and pork.

What's distinctive about this recipe is that it uses butternut squash as a replacement for beans (because beans are non-Paleo). I love butternut squash (and not so much beans), so I thought this was an excellent idea. R. likes butternut squash as well but missed having beans in his chili - a Paleo follower he is not.

The olive-avocado-sour cream-onion-jalapeño garnish is a great addition as well. It is very different from anything I've even put on chili, but the creaminess gives provides a nice contrast against the spiced chili.

I definitely think this is one recipe I will use again if I ever feel like something meaty!

Recipe courtesy of:
Paleo Table (get the recipe here)

Thursday, May 16, 2013

Cinnamon Apple, Chicken, and Pumpkin Butter Taco

Cinnamon Apple, Chicken, and Pumpkin Butter Taco

A couple months ago we went to Ohio to visit family. Our first stop was to spend an afternoon with Uncle Gary, who suggested preparing lunch together. Since we were due to arrive right around noon, however, I needed to come up with an idea for a super quick meal.

My thoughts turned to mobile food vendors, since that is exactly what they do: preparing super quick meals. I immediately thought of Pgh Taco Truck, with its delicious and often unique flavors, and was inspired to create an easy but interesting and tasty taco. Something I can prep the night before and just throw in a skillet the next day.

One of my favorite tacos from Pgh Taco Truck is an ostrich taco served with pumpkin butter, while R.'s favorite is wild boar...with pumpkin butter. So there was no question that pumpkin butter was going to be a must. From there, I chose chicken for the protein, which I would chop and marinate overnight and cook just before serving. I felt I needed one more main ingredient to go with the chicken, and since I was in the realm of fall flavors (don't judge - fall flavors are good any time of year!), I thought apples cooked in cinnamon butter would work well. Place everything in taco tortillas and topped with some sliced green onions, and...voilà! I've got my perfectly easy but tasty taco!

It was a big hit, if I may say so myself!

Cinnamon Apple, Chicken, and Pumpkin Butter Taco

Ingredients:
  • chicken breast, 1 lb
  • apples, 2 medium
  • butter, 2 tbsp
  • cinnamon, ground, 1/4 tsp
  • green onion, 2
  • pumpkin butter, for garnish (we got ours from Loafers
  • soft corn taco tortillas, 2 per taco (get 'em from Reyna's!)
  • salt and pepper to taste
For marinade (adapted from the cinnamon soy sauce marinade recipe found here ):
  • soy sauce, 1/2 cup
  • red wine, 1/4 cup
  • cinnamon, ground, 1.5 tsp
  • garlic, 1 clove chopped
  • sugar, 2 tbsp
Prep previous night:
  1. Cut chicken into bite size pieces.
  2. Combine marinade ingredients in a bowl and mix well.
  3. Place marinade and chicken in plastic bag or a bowl and marinade in refrigerator overnight.
Prep just prior to cooking:
  1. Peel and chop apples into small pieces.
  2. Slice green onions.
Cook:
  1. In a skillet under medium high heat, heat butter and 1/4 tsp cinnamon until fragrant.
  2. Add apples, and cook for a few minutes until the cinnamon butter is absorbed. Remove from skillet.
  3. Season marinated chicken with salt and pepper and cook in skillet under medium high heat until cooked through.
  4. Double up tortillas and toast on a dry flat pan. Top with chicken, apples, pumpkin butter, and green onions.

Venison Bibimbap

Slowly but surely, we've been chipping away at our seemingly endless supply of venison. Still, we had an abundance of ground venison and one can only make so many ground venison pizzas without getting bored! Then, a friend of mine who has been experimenting with venison cooking himself suggested marinating ground venison in bulgogi sauce and then making bibimbap with it. Now there's an idea!

Bibimbap is a classic Korean dish that is basically white rice topped with vegetables, meat, and an egg cooked over easy, which you break and mix in with the rest of the ingredients before consuming. I've only had bibimbap in Korean restaurants and never even came close to attempting it myself. Luckily, I discovered Maangchi.com, a website with a massive collection of authentic Korean recipes that is run by a New York transplant who was originally from Korea. It didn't take too much digging before I found a bibimbap recipe.

But first, I had to make a marinade. Although I had made bulgogi before using a different recipe, I decided to try Maangchi's just for variety's sake. I then marinated the ground venison in the bulgogi sauce overnight in the fridge.

The next day, I made some rice in the rice cooker and prepared the veggies, which included shredded carrots, about 10-15 shiitake mushrooms, 4 small zucchinis, a package of fern brakes (also known as kosari and available at Korean supermarkets), bean sprouts, and spinach. Of course the combination of veggies is not set in stone, but I wanted to follow the recipe exactly in order to replicate the authentic flavor. I did double Maangchi's recipe as I had double the amount of meat.

Ingredients for Venison Bibimbap
Veggies for the bibimbap: (L-R) Shredded carrots, shiitake mushroom,
julienned zucchini, fern brakes (kosari), bean sprout, spinach

A huge part of making bibimbap involves arranging the bowl in an attractive manner. I don't know that I did a great job with that, as I apparently fail at cooking eggs over easy without breaking the yolk (I tried multiple times, and it was just not meant to be for this non-egg eater!), and I completely forgot to add the gochujang (Korean hot pepper sauce) before snapping the photo!  But for what it's worth, here's my bibimbap (the rice is at the bottom):

Venison Bibimbap
Venison Bibimbap

Because of all the different ingredients that required preparation, I found the bibimbap to be rather high maintenance and time consuming. It was worth the attempt though, as it was very tasty, and the ground venison which was slightly sweetened from the bulgogi marinade was astoundingly delicious. Though I may be too busy to make this on a regular basis, it was great to have discovered another way to use ground venison.

Recipe courtesy of:
Maangri.com (get the bulgogi recipe here and the bibimbap recipe here)

Monday, April 29, 2013

Chinese Fried Rice with Shrimp and Venison Kielbasa

Pittsburghers will probably find this surprising, but I was well into my twenties before I had even heard of kielbasa for the first time, let alone taste it. That momentous "first time" was at a holiday gathering with R.'s family in the Pittsburgh area well before I moved here, and I remember liking the juiciness of the kielbasa and the tanginess of the sauerkraut that went along with it. It took me awhile, however, to realize the prominent place that kielbasa holds in "Pittsburghese cuisine," if there is such a thing.

Now that we are locals ourselves, it seemed fitting to have some of our venison made into kielbasa. We brought some along to a Steelers game tailgate back in December, but I was wholly disappointed by the dryness of the sausage - it was nothing like the juicy stuff I remember from that family holiday party!

While the venison kielbasa did not resemble what I know to be kielbasa, it did remind me a little bit of lap cheong - a Chinese sausage that's smoked and also very dry. (That's about where the resemblance ends, though.)

I decided to pull out an old Chinese fried rice recipe that my dad gave me eons ago and tried it with sliced venison kielbasa substituting for lap cheong. It worked out well, adding a rich layer of flavor to the fried rice.  I'm not sure we'll be getting venison kielbasa again, but if we do, this is what I will be making with it.

Venison Kielbasa
Venison kielbasa

Chinese Fried Rice with Shrimp and Venison Kielbasa

Chinese Fried Rice with Shrimp and Venison Kielbasa

Ingredients:
  • 1½ cup long-grain white rice
  • ½ lb venison kielbasa
  • ½ lb shrimp, peeled
  • 4 eggs, beaten
  • ½ cup frozen green peas
  • 1 bunch scallions, chopped
  • ½ lb fresh pineapple chunks
  • 2 tbsp peanut oil, divided (may substitute with canola oil or corn oil)
  • Salt, to taste
  • 2 tbsp Chinese soy sauce
  • 1 tbsp sesame oil (optional)
  • Sriracha sauce (optional, but highly recommended)
  • Fermented bean curd (optional; available in jars at Chinese supermarkets)
Directions:
  1. Cook rice in rice cooker or according to package directions. Let cool before frying. (Better yet, cook a day ahead to let the rice dry some before frying.)
  2. Preheat oven to 350˚F. Place kielbasa in a pan and cover with aluminum foil. Roast for 15-20 minutes, until done. Slice kielbasa using a serrated knife. Spray a skillet with cooking spray and heat on medium high, and cook each side of the kielbasa slices for 2-3 minutes.
  3. Cook green peas according to package directions.
  4. Wash and season shrimp with salt and pepper. In a wok or a skillet, fry shrimp in 1 tbsp peanut oil for about 3 minutes. Remove shrimp from wok/skillet and drain excess liquid.
  5. In the wok/skillet, add 1 tbsp peanut oil, and fry ¾ of the eggs under high heat; chop them with a spatula as you fry. Add salt to taste.
  6. Lower heat to medium, add rice and cook. Add 2 tbsp soy sauce, 1 tbsp sesame oil, and salt to taste.
  7. Add kielbasa, shrimp, green peas, scallion, pineapples, and the remainder of the eggs. Mix well and fry for 3-5 minutes.
  8. Serve with Sriracha sauce and/or fermented bean curd.
Yields 4-5 servings

Saturday, April 27, 2013

Cinnamon Apple Almond Quinoa with Venison Maple Sausage

Some of the venison meat we got out of R.'s deer was made into maple sausage. R. likes eating it as is.  Me, I'm not much of a breakfast sausage kind of person, but he raved about it so much that I thawed a package of the maple sausage and cooked a little bit of it just to try, foolishly wondering if this was the wonder sausage that would turn me into a breakfast sausage kind of person.

Well, though tasty as it was - and boy, did it smell wonderful! - I thought the sausage was far too salty to stand on its own.

So no, this did not turn me into a breakfast sausage kind of person. Now what am I going to do with more than a pound of just-thawed venison maple sausage??

As per usual, I took to the internet, and found this recipe by Iowa Girl.

The original recipe calls for just 3 oz of maple sausage, so I had to multiply everything by 6 in order to use up all the venison maple sausage I had on hand. This means making a big batch with plenty of leftovers...but now we have another problem: Chopped raw apples turn brown quickly and don't last as a leftover dish.

So I made a slight modification by cooking the chopped apples in cinnamon butter. I also cooked the quinoa in a rice cooker rather than on the stovetop, as I find the consistency to be much better this way- probably a reflection of my subpar ability to cook grains or anything grain-like without a rice cooker.

Cinnamon Applie Quinoa with Venison Maple Sausage
Cinnamon Apple Almond Quinoa with Maple Venison Sausage

So here is my version of the the Cinnamon Apple Almond Quinoa with Venison Maple Sausage:

Ingredients:

  • 3 cups quinoa
  • 6 cups chicken broth (water is OK too)
  • 3 teaspoon extra virgin olive oil
  • 18 oz maple breakfast sausage
  • 12 green onions, sliced
  • 6 small apples, chopped
  • 1.5 cup chopped almonds
  • 3/4 cups dried cranberries
  • 2 tbsp butter
  • 1/4 tsp ground cinnamon

Directions:
  1. Rinse quinoa in a fine mesh strainer under cold, running water. Cook quinoa in rice cooker with chicken broth. When finished, transfer to a  large bowl.
  2. Meanwhile, heat olive oil in a skillet over medium heat. Add sausage then brown and drain, if necessary. In another skillet, melt butter on medium high heat.  Add cinnamon, and cook until fragrant, about 30 seconds. Add apples and cook until the cinnamon butter is absorbed.
  3. Add cooked sausage, green onions, apples, almonds, and cranberries to the quinoa. Toss to combine then serve.
Yields about 9 hefty servings.

Recipe heavily adapted from:
Iowa Girl (get the original recipe here)


Friday, April 26, 2013

Pumpkin and Sausage Pasta

Pumpkins: It is what brightens the fall season when the skies get dark earlier.

I love pumpkin smoothies, and I try to extend my personal "pumpkin smoothie season" for as long as possible by stockpiling pie pumpkins every fall weekend, puréeing, then storing it in the freezer.  When the winter ended (finally!), however, it was also time to say goodbye to the last bit of my frozen pumpkin purée and pray that fall comes around again soon.

I had just enough pumpkin purée left to try something different with it: a pumpkin pasta sauce, to go along with some fresh pumpkin fettuccine I had gotten from Penn Mac. I figured it might work well with sausage, fall spices, and some herbs, and came across this Rachael Ray recipe that seemed to fit pretty much what I was trying to go for.  I used my own pumpkin purée, of course, as opposed to the canned variety called for in the recipe, and was a bit more generous with the cinnamon and nutmeg, because, well, I like my fall spices.

Pumpkin and Sausage Pasta

Next time I might try it with spicy Italian sausage and use parsley instead of sage.  I didn't mind the sage, but I think I might prefer something a little less dominant.

Ahh...is it fall yet?

Recipe courtesy of:
Food Network (get the recipe here)

Monday, April 22, 2013

Venison Bulgogi

One of the cuts of venison we got from my husband's kill was simply marked "steak" on the package. Now when I think steak, I think beef sirloin or filet mignon, so naturally I had assumed that this would be a similar cut. Once thawed, however, I discovered that it was more like bone-in flank steak, with tendons running down the length of the meat. As venison is already a tougher meat, it looked like the only way to enjoy the steak was to slice it thinly across the grain and marinate the heck out of it.

So the next question was, how does one serve meat this way? Well, like Korean bulgogi!

I found this great bulgogi sauce recipe online and used it to marinate my meat overnight. Once the meat is marinated, I cooked it on a preheated, oiled grill (pan frying in an oiled skillet under high heat works too) until slightly charred on both sides. I served it with rice, topped with more bulgogi sauce (I made a second serving for the topping).

Venison marinating in bulgogi sauce


Venison Bulgogi
Venison Bulgogi

Super delicious!

Recipe courtesy of:
Savory Sweet Life (get the recipe here)

Monday, March 11, 2013

Venison Stew

Back in Pittsburgh, I've continued to do a ton of venison cooking, as I mentioned in a post last month. We have venison in a variety of different cuts, so I've been trying a number of different recipes. In addition to ground venison, we seem to have a lot of chops as well, which the butcher has mostly chopped up for us, so it seemed like they would work well in a stew.

I tried it in Emeril's Venison Stew recipe, and it was excellent! It is not a terribly difficult recipe, but the red wine adds a certain richness to the flavor, and the amount of heat can be adjusted to one's liking by using more or less of Emeril's "Essence" blend.  (I use about a tablespoon or two.)

I made two modifications to the recipe: First, I added some smoked paprika in the Essence. Second, I included chopped potatoes and added them to the stew when I add the stock.

We both love this stew and have made it often!

Venison Stew 1
Venison Stew

Venison Stew
Venison Stew

Recipe courtesy of:
Emeril Lagasse, Food Network (get the recipe here)

Sunday, February 10, 2013

Venison Meatballs with Roasted Garlic Mashed Potatoes

Being a Western Pennsylvania boy, R. grew up hunting deer with his dad. He still goes once a year in the fall as part of a family tradition.

The side effect of having a husband who hunts? You might suddenly end up with some 30 pounds of venison in your freezer! Having never cooked venison before, I suddenly find myself scouring the internet for all sorts of tips and recipes. We have various cuts of the meat, but ground venison is especially in abundance, and not being someone who cooks with ground meat regularly, I needed ideas! Meatballs seemed obvious and simple enough, so that's what I started with.

I found a pretty good venison meatball recipe online, and the meatballs were easy enough to make and tasted great, too! R. commented on how much he loved the sauce. I paired the meatballs with my special roasted garlic mashed potatoes (recipe below) and assorted veggies. Excellent!

Venison Meatballs
Venison Meatballs with Roasted Garlic Mashed Potatoes

Venison Meatballs

Recipe courtesy of Taste of Home (get the recipe here).

Roasted Garlic Mashed Potatoes

Ingredients
  • 1 large head garlic
  • 1 tablespoon olive oil
  • 2 pounds russet potatoes (about 3 large potatoes)
  • 4 tablespoons butter, softened
  • 1/2 cup sour cream
  • 4 oz cream cheese or Neufchatel cheese
  • salt and pepper to taste
  • crushed red peppers to taste (optional)
Directions
  1. Preheat oven to 350 degrees F (175 degrees C).
  2. Drizzle garlic with olive oil, then wrap in aluminum foil. Bake in preheated oven for 1 hour.
  3. Peel potatoes if desired. (Otherwise, clean potatoes thoroughly with vegetable brush.) Chop potatoes. Bring a large pot of salted water to a boil. Add potatoes, and cook until tender, about 15 minutes. Drain. Stir in butter, salt, pepper, crushed red peppers (optional), sour cream, and cream cheese.
  4. Remove the garlic from the oven, and cut in half. Squeeze the softened cloves into the potatoes. Blend potatoes with an electric mixer until desired consistency is achieved.


Sunday, January 6, 2013

Herb-Roasted Turkey Breast with Butternut Squash Chutney from Cinco de Mayo Salsas

I roasted my first turkey a couple months ago!  And no, it wasn't even for Thanksgiving!  But, I had gotten hold of some phenomenal Butternut Squash Chutney from our "Salsa Man" - a fall special - and he had recommended serving it with turkey.

And so I roasted a turkey.  (OK, technically just the breast, but still.)

After some research, I decided to use this Ina Garten recipe, which turned out to be absolutely amazing.  The herbs added so much flavor to the turkey, and the butternut squash chutney was perfect with it.  The only problem was that this was far too much turkey for two people!  A good problem to have, though, I suppose. :)

Herb-Roasted Turkey Breast

Herb-Roasted Turkey Breast with Butternut Squash Chutney from Cinco de Mayo Salsas

The butternut squash chutney was so good we brought a couple tubs to our family Thanksgiving dinner.  I have a feeling it will become part of our Thanksgiving tradition in the coming years. :)

Recipe courtesy of:
Ina Garten on the Food Network (get the recipe here)

Click here for more recipes using Cinco de Mayo Salsas, available at the Pittsburgh Public Market during the winter and all around town during the farmers market season.

Saturday, July 21, 2012

Lemon Thyme Zucchini Rice Casserole

In my last post I mentioned growing more herbs this year, which necessitates more creativity on my part to cook with herbs ready for harvest.  My thyme has been growing like mad, so I made this rice dish, modified from a recipe I had found online sometime ago.  I'm surprised how great it turned out, and a friend tried the recipe with basil instead of thyme and LOVED it. :)  I think the key is to use good-quality cheese, and the lemon gives it a nice tang.  This is definitely going into my regular rotation.

Lemon Thyme Zucchini Rice Casserole

Ingredients:


Long grain rice, uncooked, 1.5 cups
Fresh thyme leaves, 1 tbsp
Lemon juice, 1 tbsp (about 1/2 a lemon)
Zest of 1/2 a lemon
Olive oil, 2 tbsp
Zucchini, 1.5 lbs, cubed
Green onions, 3, sliced
Garlic, 2 cloves, minced
Salt and pepper, to taste
Garlic salt
Paprika, 1 tsp
Oregano, 1 tsp dried
Plum tomatoes, 4, chopped
Sharp cheddar cheese, one 1/3-lb block, freshly shredded, divided
Cooking spray

Directions:
  1. Preheat oven to 350 degrees F.
  2. Cook rice, thyme leaves, lemon juice, and lemon zest together in rice cooker (or follow package directions if a rice cooker is not available).
  3. Heat oil in a skillet over medium heat.  Cook the zucchini, green onions, and garlic about 5 minutes, until zucchini is tender.  Season with salt, pepper, garlic salt, paprika, and oregano.  Mix in cooked rice, tomatoes, and cheese, preserving some of cheese for the topping.
  4. Spray a 2.5 quart casserole dish with cooking spray.  Transfer content from the skillet to the casserole dish.  Top with remaining cheese.
  5. Bake, uncovered, for 12 minutes.

Yields 4-5 servings

Roasted Lemon Rosemary Chicken

Last summer, I started growing herbs at home - parsley, basil, and mint - and really enjoyed having fresh herbs at my disposal all season long.  This year, I decided to expand my collection to include cilantro, thyme, and rosemary.  That's all well and fine, except every week I have to figure out some way to use a large amount of herbs ready to be harvested!  My first "project" was to use up some rosemary.  I thought it might go well with lemon and some breaded chicken, so I modified an old breaded chicken recipe to create this.

Roasted Lemon Rosemary Chicken

Ingredients:

Chicken breast, 4 servings
Salt and pepper
Flour, about 1/2 cup
Bread crumbs, about 1/2-1 cup
Rosemary leaves from 1 sprig
Dijon mustard, 1 tbsp
Egg, 1 large
Lemon, 1
Cooking spray

Directions:
  1. Preheat oven to 375 degrees F.
  2. Juice half the lemon.  Save the other half for garnish.
  3. In a small bowl, beat together egg, Dijon mustard, lemon juice, and rosemary leaves.
  4. Place flour in a flat-bottomed bowl.  Place bread crumbs in another flat-bottomed bowl.
  5. Season chicken with salt and pepper.  Roll chicken in flour, then dip in the egg mixture, then roll in bread crumbs.
  6. Spray an oven-proof skillet with cooking spray and heat on medium-high heat.  Cook chicken for 5 minutes, turning once, until the breading is slightly browned.
  7. Bake chicken for 20-25 minutes, until done.
  8. Serve with lemon for a splash of juice.

Sunday, July 8, 2012

Chicken Smothered in Gravy

After two full weeks of dining out, I was desperate for some homecooked meals once we got back to Pittsburgh!  I was also itching to try some new recipes in my collection; I had been so busy the few months leading up to the wedding that I had been cooking the same easy stuff over and over.  One recipe I tried for the first time was this Chicken Smothered in Gravy, which turned out quite good.  I paired it with some rice with bacon mixed in; next time, I might make more sauce.  The recipe is great otherwise!

Chicken Smothered in Gravy


Recipe courtesy of:
Food and Wine (get the recipe here)

Monday, May 7, 2012

Thai Red Curry Turkey Meatballs

I happened upon this Thai Red Curry Turkey Meatballs recipe in The Perfect Pantry blog a little while ago and immediately knew I had to try making it myself!  I think they turned out quite good.

The only mistake I made was overseasoning the meatballs!  The recipe had stated that ground turkey tends to be bland, so I did not hold back.  Turns out I should have heeded the advice to use just half of seasoning and add more after tasting.  These meatballs had a particularly strong curry flavor, and they were spicy too, even though I didn't expect them to be.  I might have to use a little less curry paste next time along with less salt.  Still, I was quite happy with them.  I paired the meatballs with a simple curry rice (just jasmine rice with  Madras curry powder and raisins added before cooking) and it was delicious.

Thai Red Curry Turkey Meatballs

Recipe Courtesy of:
The Perfect Pantry (get the recipe here)

Thursday, March 29, 2012

Mexican Meatballs with Smoky Chipotle Sauce from Cinco de Mayo Salsas

Every time I visit Arturo the "Salsa Guy" (Cinco de Mayo Salsas) at the Pittsburgh Public Market, he asks me if I'm ready for a new recipe.  Duh, of course I'm always game for a new recipe, especially one from Arturo!  So thanks to his instructions, I made meatballs for the very first time a couple of weekends ago!

Mexican Meatballs with Smoky Chipotle Sauce from Cinco de Mayo Salsas
Mexican Meatballs with Smoky Chipotle Sauce

Mexican Meatballs with Smoky Chipotle Sauce from Cinco de Mayo Salsas
Mexican Meatballs with Smoky Chipotle Sauce

Ingredients:
1 lb ground beef
1 medium onion, small dice
2 stalks celery, small dice
1 tsp ground cumin
1 tsp salt
1 cup stale bread crumbs*
1 (12 oz) can tomato sauce
1 (8 oz) tub Smoky Chipotle sauce from Cinco de Mayo Salsas

For the sides:
Spanish rice
black beans

* I asked Arturo if it would be OK to use store-bought bread crumb, and he said it's better to make your own stale bread crumb. Just cut a few slices of bread into squares (I used 6 regular slices of whole wheat), leave them out for a couple of days until hard, then grind in food processor.  (UPDATE 4/14/2012: I recently came across this blog post demonstrating that at least some store-bought, commercial bread does not go stale for a long time, so I'd recommend sticking with something from the bakery.)

Directions:

Preheat oven at 375 degrees.  Mix together the first six ingredients (from ground beef to bread crumbs).  Form into one-inch balls and bake in a baking dish  (a 9 x 13 dish works well).  Meanwhile, mix together the chipotle sauce and the tomato sauce.  After meatballs have baked for 20-25 minutes, pour sauce over meatballs and continue baking for another 10 minutes.

Serve with spanish rice and whole black beans.

Makes about 16-20 meatballs.

Click here for more recipes using Cinco de Mayo Salsas, available at the Pittsburgh Public Market during the winter and all around town during the farmers market season.

Saturday, March 10, 2012

Sweet Potato and Black Bean Chili

My third vegetarian meal this week was a Sweet Potato and Black Bean Chili.  Admittedly, I had to try this twice to get it right, but it was wonderful once I did.

Instead of canned black beans, I picked up 1/2 pound of dried beans from Crested Duck Charcuterie (they have a store in Beechview and are at the Pittsburgh Public Market on the weekends).  With dried beans, there was the additional steps of soaking and cooking them before they were ready to be added to the chili.

To soak the beans, I covered them with several inches of water and a little salt in a container and let them soak in the refrigerator overnight.

What 1/2 lbs of dried, pre-soaked black turtle beans looked like in my 6-cup container

They doubled in size after about 10 hours!

Beans, post-soaking, rinsing, and draining

I rinsed and drained the beans, and then placed them in a pot of boiling water to simmer for about 1.5 hours, skimming the foam at the top and checking towards the end to ensure doneness.  I also seasoned the beans with salt.

They were then ready to be added to the chili!  The first time I tried this recipe I thought it was a little bland, so this time I used twice the amount of ground chiptole chile recommended (so 1 tsp total) and put in two sweet potatoes instead of just one.  As a result of the additional sweet potato, I was also fairly generous with the amount I used of the other ingredients, for example, using 3 cups of water (instead of 2.5), juice from a whole lime (which is a little more than 4 tsp), and generally adding in a little more of each of the spices.  The final product was really good, and once tomatoes are back in season, I'd love to try this recipe with fresh tomatoes as well!

Sweet Potato and Black Bean Chili


Recipe courtesy of:
EatingWell (get the recipe here)

Friday, March 9, 2012

Beet Tacos with Arugula and Crunchy Tofu

I love beets.  No, I loooooove beets!  If they weren't so high maintenance, I'd be eating them all day, every day!

And who would have thunk that beets go well with fried tofu?  Well, apparently Leah Lizarondo over at Brazen Kitchen did.  For my second vegetarian meal this week, I made her "Turkmen Tacos": Beet Tacos with Arugula and Crunch Tofu.  I also like tofu, so I was very curious to try this recipe out.  The one change I made was using vegetable (soybean) oil instead of olive oil to fry the tofu, since the only kind of olive oil I have is extra-virgin which, from what I understand, isn't great for frying because of its lower smoke point.  I also didn't have vegenaise on hand so I used mayo, which means my version of the tacos was not vegan, but the recipe itself is.  The tortillas I used were fresh corn tortillas from Reyna Foods in the Strip District.  The result was fabulous, and surprisingly filling, too!

Beet Tacos with Arugula and Crunchy Tofu

Recipe courtesy of:
Brazen Kitchen (get the recipe here)

Sunday, March 4, 2012

Grilled Stuffed Portobello Mushrooms

I'm cooking all vegetarian this week.  That is not to say that I'm going to eat vegetarian all week, but I've been cooking and consuming so much meat lately that I felt I should balance it out with more veggie dishes.  First up was some Grilled Stuffed Portobello Mushrooms from a Cooking Light recipe I found a while ago but never got around to trying.  It works well as an appetizer, a side dish, or even part of a main course.  I myself paired it with some red pepper pasta topped with homemade roasted red pepper and tomato sauce.  A very tasty, easy, and light meal.

Grilled Stuffed Portobello Mushrooms


Recipe courtesy of:
Cooking Light (get the recipe here)